Sunday, December 9, 2007
Saturday, December 1, 2007
Resume

Brenda L. Byrne-Gladwell
Education:
Masters of Teaching Visual Arts 2008
University of the Arts
Philadelphia, PA 19102
Bachelor of Fine Arts in Illustration1984
Rhode Island School of Design
Teaching Experience:

Head of Art Department/Teacher
Saint Ann School 2005-09
Art Coordinator for school
Substitute Art Teacher Grades K-12
Lawrence Township School System 2005-09
Director of Art Department
Faith Development Center Art Program 2006-09
Developed summer Art Program for children
2nd to 12th grade
Virtus Training 2006
Training for adult awareness in schools
against child sexual abuse and violence
Art Director/ Instructor
Ben Franklin Swim Club
Art Coordinator for local Club

Summer 2005
Creative Cordinator
American Legion Auxiliary, Post 414
for American Legion functions
Craft coordinator 2006-09
Art Teacher
Princeton Arts Council, 2005-7
Substitute Teacher
Princeton Day School
Princeton NJ 1999
Honors:
Fellowship for University of the Art
Graduate MAT Program
Master of Teaching Visual Arts
Excellence in Teaching Art- UARTS 2009
Participated in Resident Artist Program
funded by the
Lawrence Township Education Foundation,
Eldridge park school with teacher Jennifer Gerlack
Lawrenceville, NJ 08648
Service Learning :

E.M. Stanton
Philadelphia Pa
Susan Kettel
High School of the Future
Philadelphia Pa
Betty Lindy
Bridge Academy
Lawrence NJ
Sara Bernotas
Community Service:
Lead Mural designer
Play ground Mural Design
Lawrenceville Elementary School
Lawrenceville New Jersey
Lead Mural Project supervisor
Mural design inside Slackwood Elementary School
Lawrenceville New Jersey
Helping Hands Club Creative Coordinator
Eldridge Park School 2004
Raised money for relief fund for tsunami victims
Craft Coordinator 2006-07
American Legion Auxiliary, Post 414
Initiates creative projects for
American Legion advents
Designer / Muralist
Designer Show House 2002
Junior League of Greater Princeton
Hilfield House
Princeton ,NJ 08648
Lawrence Township Board of Education

Playground design 2006
Eldridge Park / Slackwood Schools
Map of the United States
Slackwood School 2006
American Legion Women Auxiliary
American Flag
Eldridge Park School
American Legion Women Auxiliary
Professional Experience:
Freelance Artist
Gladwell Studios 1995 - present
Designing freelance for Gift ware industry
Designer/ Muralist
Designer Show House 2004
Junior League of Greater Princeton
The Hodge House
Princeton, NJ 08450
Freelance Design Group
American Visual Arts 1990-2002
Malvern, PA 19355
Freelance Designer
Ensco Products1995-2000

Freelance Designer
Dept 56 1992-2000
Freelance Designer
Lenox China, Inc. 1990-2005
Lawrenceville, NJ
Head of plush toys division
Russ Berrie Company 1986-1990
Oakland, NJ
Greeting Card Designer
Hallmark Cards, Inc.
Kansas City, Mo
1984-1986
Klimt

Art Philosophy
by
Brenda Gladwell
Art education is a untapped resource that educators are just beginning to value in creating a well rounded curriculum. In schools today we are seeing a growing population of children with many learning differences. These children do not always connect with the standard way of learning. Some students need a tactile and tangible way to grasp Ideas and concepts. I include myself in this group and understand the need for it because, I am dyslexic and the arts have given me a way that I can make sense of the world around me.
An art program that includes a well round curriculum enhances the ability of students to achieve a greater understanding of social and political issues of the world around them. It encourages students to deal creatively with concepts in a sensitive and knowledgeable manner. Art balances the development of fine motor skills and creative thought a process, which develop students appreciation of their own achievements and others. A program that integrates history, science, math, and social studies along with a diverse outlook contributes to the over all growth of a student. In addition to teaching compassion and inspiring thinking the arts also help us better understand our own experience thereby creating a richer fulfilling life.
Education in the arts is a key component in the development of each of us. The Arts, in addition to being the heart of culture, also creates a common language that can be understood by all people. Research shows that studies in the fine arts is integral in improving learning throughout all academic areas. The children of today have to understand and be able to communicate with a vast number of people from different cultures. The arts are a language that everyone can understand, regardless of differences in education, age, or socioeconomic background. In a world of ever-expanding diversity, the arts serve as a bridge across language and cultural barriers and link, both within and between cultures.
It is my hope that by teaching art, I am able to help young minds learn to think for themselves. I wish to activate the knowledge that every child has, by helping them to focus their thinking and define their problems. Through engagement in the fine arts, I will help students to expand their imaginations, and inspire children to think of creative resolutions in all aspects of their lives.
Lesson Plan....Coiling
Brenda Gladwell
Grade; 7- 9
Title: Basket Coiling using Navajo Indian Design

Brief History:
The Navajo Indians are well known for their basket weaving. The four basic techniques to weave baskets are wicker, plaiting, twining, and coiling. Wicker, plaiting and twining are all weaving with a weft (horizontal) and a warp (vertical) of natural materials. Coiling is a technique similar to sewing.
Coiling is a technique that is based on a bundle foundation. The foundation coil is made of pine needles, sweet grass and willow twigs. The flexible plant bases of the coil allow the coil to wrap around itself to create a bowl shape. The coil can also be different thickness, depending on the baskets’ purpose.
The Navajo wedding basket is one of the many recognizable designs in Navajo basket art. The wedding basket is filled with rice at weddings. The Bride and Groom eat from the basket first, then it is passed around. It is passed around until the basket is empty. The last person to eat from the basket gets to take it home.
Standards:
2.3 Measurement and Estimation
8.1 Historical Analysis and Skill Development
9.2 Historical and Cultural Context
9.1 Production
Goal:
The student will learn the technique of coiling in basket making.
Objective:
Students will learn how to coil.
Students will draw out their design.
Students will understand the pattern of the Navajo Wedding Basket.
Students will learn about materials used in Navajo Indian basket making.
Resource Material:
The teacher will provide examples of Coiled Navajo Wedding Basket. Examples of other Native Navajo design will be provided. The teacher will show students how to coil in a figure eight stitch to lock coils together.
Material:
Yarn (red, beige, and black)
Coil
scissors and needles
Teacher Preparation:
Teacher will show students the Navajo Wedding Basket pattern
Teacher will demonstrate coiling.
Teacher will show how to layout design for basket.
Teacher will tell students about the natural materials used by Navajo Indians to make baskets
Teacher will explain dyeing process of natural materials
Teacher will have symbols from Navajo designs as reference.
Teacher Introduction:
The Navajo Indians are well known for their basket weaving. There are four basic weaving techniques, and they are wicker, plaiting, twining, and coiling. Wicker, twining and plaiting are all weaving with a weft ( horizontal) and a warp (vertical). Coiling is similar to sewing.
The coiling technique is based on a bundle foundation. The bundle is created with natural materials that are bound together to create a coil. The Navajo Indians form the coil base from pine needles, sweet grass, and/or willow twigs. Many baskets are made of different materials depending on the natural resources available. The flexible plant-based coils provide a strong moldable coil that can wrap around itself to make a bowl shape.
The coil can be different thickness depending on the base materials and the eventual purpose of the container. There are also two types of coiling one is called close coiling the other is loose coiling. Close coiling means there is no space I between the coils. Open coiling means there is an open space between the coils.

The Navajo Wedding basket is a recognizable design in basket making. The wedding basket is used at weddings. The bowl is filled with rice. The bride and Groom are the first to eat out of it, then it is pasted around. When the basket is empty, whoever has the bowl gets to keep it.
The beige, black, and red colors of the basket also have a meaning.
• Beige- represents the Navajo people. The beige color is the natural color of the fiber used.
• Red- represents the earth - the red is made from the root of the Alder Leaf Mountain Mahogani that is boiled down to a dye.
• Black- represents the hardships they travel through - the black is made from pinion pitch which is crushed with sumac leaves and coal.
Ask students to use only Navajo Indian designs and colors in there baskets.
 Directions:
1. Students will draw their designs on the paper template using Navajo colors.
2. Each student receives a yard of coil, needle, and yarn
3. Students are shown how to wrap yarn around the coil.
4. The beginning stitch is shown using a figure eight formation around the two coils to secure coils together.
5. Students will start to create their coil basket using the design they created..
Critique:
Students will evaluate their work and ask what would be different if they were to use natural materials? Did all students use Navajo symbols? Did all student understand the figure eight stitch.
Time Budget:
10 minutes introduction
30 minutes for class to master stitching technique.
10 minutes at the end of class for discussion of technique and symbols.

Vocabulary:
Coiling - a weaving technique
Warp - the vertical line of weaving
Weft - the horizontal lines of weaving
Close coiling - a tight space between coils
Open coiling - an open space between coils
Weaving -to interlace materials
Grade; 7- 9
Title: Basket Coiling using Navajo Indian Design
Brief History:
The Navajo Indians are well known for their basket weaving. The four basic techniques to weave baskets are wicker, plaiting, twining, and coiling. Wicker, plaiting and twining are all weaving with a weft (horizontal) and a warp (vertical) of natural materials. Coiling is a technique similar to sewing.
Coiling is a technique that is based on a bundle foundation. The foundation coil is made of pine needles, sweet grass and willow twigs. The flexible plant bases of the coil allow the coil to wrap around itself to create a bowl shape. The coil can also be different thickness, depending on the baskets’ purpose.
The Navajo wedding basket is one of the many recognizable designs in Navajo basket art. The wedding basket is filled with rice at weddings. The Bride and Groom eat from the basket first, then it is passed around. It is passed around until the basket is empty. The last person to eat from the basket gets to take it home.
Standards:
2.3 Measurement and Estimation
8.1 Historical Analysis and Skill Development
9.2 Historical and Cultural Context
9.1 Production
Goal:
The student will learn the technique of coiling in basket making.
Objective:
Students will learn how to coil.
Students will draw out their design.
Students will understand the pattern of the Navajo Wedding Basket.
Students will learn about materials used in Navajo Indian basket making.
Resource Material:
The teacher will provide examples of Coiled Navajo Wedding Basket. Examples of other Native Navajo design will be provided. The teacher will show students how to coil in a figure eight stitch to lock coils together.
Material:
Yarn (red, beige, and black)
Coil
scissors and needles
Teacher Preparation:
Teacher will show students the Navajo Wedding Basket pattern
Teacher will demonstrate coiling.
Teacher will show how to layout design for basket.
Teacher will tell students about the natural materials used by Navajo Indians to make baskets
Teacher will explain dyeing process of natural materials
Teacher will have symbols from Navajo designs as reference.
Teacher Introduction:
The Navajo Indians are well known for their basket weaving. There are four basic weaving techniques, and they are wicker, plaiting, twining, and coiling. Wicker, twining and plaiting are all weaving with a weft ( horizontal) and a warp (vertical). Coiling is similar to sewing.
The coiling technique is based on a bundle foundation. The bundle is created with natural materials that are bound together to create a coil. The Navajo Indians form the coil base from pine needles, sweet grass, and/or willow twigs. Many baskets are made of different materials depending on the natural resources available. The flexible plant-based coils provide a strong moldable coil that can wrap around itself to make a bowl shape.
The coil can be different thickness depending on the base materials and the eventual purpose of the container. There are also two types of coiling one is called close coiling the other is loose coiling. Close coiling means there is no space I between the coils. Open coiling means there is an open space between the coils.
The Navajo Wedding basket is a recognizable design in basket making. The wedding basket is used at weddings. The bowl is filled with rice. The bride and Groom are the first to eat out of it, then it is pasted around. When the basket is empty, whoever has the bowl gets to keep it.
The beige, black, and red colors of the basket also have a meaning.
• Beige- represents the Navajo people. The beige color is the natural color of the fiber used.
• Red- represents the earth - the red is made from the root of the Alder Leaf Mountain Mahogani that is boiled down to a dye.
• Black- represents the hardships they travel through - the black is made from pinion pitch which is crushed with sumac leaves and coal.
Ask students to use only Navajo Indian designs and colors in there baskets.
Directions:1. Students will draw their designs on the paper template using Navajo colors.
2. Each student receives a yard of coil, needle, and yarn
3. Students are shown how to wrap yarn around the coil.
4. The beginning stitch is shown using a figure eight formation around the two coils to secure coils together.
5. Students will start to create their coil basket using the design they created..
Critique:
Students will evaluate their work and ask what would be different if they were to use natural materials? Did all students use Navajo symbols? Did all student understand the figure eight stitch.
Time Budget:
10 minutes introduction
30 minutes for class to master stitching technique.
10 minutes at the end of class for discussion of technique and symbols.
Vocabulary:
Coiling - a weaving technique
Warp - the vertical line of weaving
Weft - the horizontal lines of weaving
Close coiling - a tight space between coils
Open coiling - an open space between coils
Weaving -to interlace materials
Friday, November 30, 2007
Lesson Plan..........art element

Hair Lines
Teacher Brenda Gladwell
5th Grade
Brief History:
A line is the first mark made by a child. Lines are used to write and draw. Having control over mark making gives a child the ability to express themselves.
A simple line can represented a feeling, a direction, and a movement. The way in which a line is made can very depending on what the child wants it to say. Lines made by artist are considered their signature, because each person has a unique mark.
Standards:
9.1.A.5- Production know and use elements and principles of art
9.3.B.5- Know that work in art can be described by using the art elements principles and concepts
2.3 Measurement and estimation
Goals:
Student will learn control their pens making contour line of hair on a head to create different types of lines.
Objectives:
1. Students will draw a head shape at top or bottom of page
2. Students will draw contour lines of hair
3. Students will create a least 5 types of lines.
4. Students will control pens so lines do not over lap.
5. Students will produce a head with 5 different types of descriptive lines to create hair on top of head with controlled contour lines.
Resources Examples:
Example of Art that has been drawn by famous artist using lines to create movement, direction, rhythm, contour and texture. Art works by Henri Matisse, Keith Haring, Leonardo Di Vinci and Paul Klee are good examples of artists who use lines to describe images.
Supplies:
• black pens two different thickness
• white paper 8 x 12
• chart of descriptive line

Teacher preparation:
Teacher will have materials ready
Teacher will have example of different kind of lines
Teacher will have exemplars of project
Teacher will have reproductions of line art created by famous artist
Teacher will create a rubrics for the critique
Teaching the Lesson:
Everyone knows what a line is. Can you name different kinds of line?
( Draw on board different kind of lines children name )
How would you draw a line to represent an emotion?
( Show examples of line that have feeling )
How would you draw a line to give a direction?
( show examples of lines that show direction )
Lines communicate many different feelings and meanings. An artist lines are like their signature. A signature is a line of letters that make up the letter of your name. Do you think that your signature can be expressive? It takes great control over your pen to have mastery over your mark marking. If you do not use control when using your pen, your lines can look sloppy and messy. Have any of your teachers ever ask you to write neater?
Paul Klee once said that drawing a line is like taking a dog for a walk. Why do you think he said that?
Paul Klee, Matisse, and Leonardo Di Vinci are all artist that used line to create feeling in their art. Illustrators are another kind of artist that uses lines to create their designs for books. Artist like Bill Schults and Keith Haring both used lines to create a characters. The way in which the lines of their characters were drawn creates a feeling about the characters through the marks they have drawn. They were able to draw these images so that when you look at the lines you get a feeling about the character. These artist had great control over the tools they used to create their images.
Today we are going to work on our line control. We are going to use lines to create hair on a persons head. We are going to use contour lines to out line each hair. The hairs can be wiggly, straight, thick, thin, or zig zag. You can create a rhythm by repeating line designs or variation by using different lines next to each other. How each hair grows is up to you. Be sure to use 5 different kinds of descriptive line work. No scribbling. Each hair should have a direction and a feeling.
Direction:
1. Everyone has a paper and pen
2. Everyone draws a U shape at the top or bottom of the page ( not the center )
3. Start to draw contour lines of hair
4. Encourage children to use at least 5 different kinds of lines
5. Cover entire page with hair
Closure:
Students will all display artworks on wall. Teacher will conduct critique using rubrics.
Critique/Evaluation/ Assessment:
Each student will be critiqued with a rubrics created by the teacher
Extension:
Students who finish early can go back into their drawings and add patterns or textures to individual hairs.
Time Budget: 45 minutes
Vocabulary:
Lines- the path made by a moving point, straight or curved
Texture - the visual feel of the surface area
Variety- difference that provide interest
Rhythm- repetition of accented elements
Contour line- a line that represents the outside edge of the image
Safety concerns: none
Bibliography:
Ted Barlag (1997) Arts and Activities March
http://www.linesandcolors.com/category/pen-ink
Lesson Plan with book....Ginger Bread Baby

Book....Ginger Bread Baby
Lesson: Gingerbread Baby
Teacher: Brenda Gladwell
3rd Grade
Brief Background:
The children’s story, Gingerbread Baby, by Jan Brett, is about a gingerbread cookie that came out of the over too soon and ran off. Everyone tried to catch the baby cookie but the young boy who made him is the only one clever enough to figure out how to bring the gingerbread baby back home.
Standards:
9.1.3.A: Know and use elements and principles of art to create a 3D piece of artwork.
9.1.3.B: Recognize, use, and demonstrate a variety of elements and principles to produce an artwork.
9.1.3.H: Handle materials, equipment and tools safely at work and performance spaces.
Goal:
Students will design a 3-D Gingerbread Baby based on the children book Gingerbread Baby, by Jan Brett.
Objectives:
1. Students will listen to the story
2. Students will create their own gingerbread baby from cut paper
3. Students will research cookie decorations
4. Students will work with craypas
5. Students will sew two sides together and stuff their gingerbread baby
6. Students will create a 3-D gingerbread character

Materials:
• Hole punch

• Yarn
• Craypas
• Scissor
• Glitter glaze paint
• Newspaper
• Pencils
• pattern of gingerbread baby
• Heavy brown paper
• spring loaded cloth pins
Resource Materials/Visual Aids:
Book- Gingerbread Baby, by Jan Brett
Examples of decorated cookies.
Teacher Preparation:
Teacher will create the gingerbread baby pattern. Teacher will create an exemplar of gingerbread baby. Teacher will gather all materials and prepare for class.

Teacher:
Has anyone every made a gingerbread cookie and decorated it? What sort of things do you use as decorations? I would like to read you a story about a gingerbread cookie that was let out of the oven a little too soon and a young boy who was clever enough to catch him.
Teacher will read story Gingerbread Baby, by Jan Brett, to the class. Class will talk about the gingerbread baby and talk about the different ways he/she could be decorated.
Teacher describes to students how they will make their own gingerbread babies out of cut paper that is sewn and stuffed. Teacher will demonstrate how to use hole punch and sew the two side of the gingerbread baby together.
Directions:
1. Trace using the pattern onto two pieces of brown heavy paper and cut out at the same time.
2. Keep both cut outs together with clothes pins and use hole punch all the way around the circumference of the gingerbread baby to create holes for sewing.
3. Sew with yarn 3/4 of the way around the image with red yarn leave a section open for stuffing.
4. Use craypas to create clothes and decorations on both sides of the gingerbread baby.
5. Paint over both sides of image with a glitter glaze wash to create an icing effect.
6. Let dry.
7. Stuff gingerbread baby with torn newspaper.
8. Finish sewing up the cookie and tie in a nice bow.
* You can glue on buttons, ribbons and beads after cookie is sewn up to embellish project.
Tuesday, October 30, 2007

Saturday, October 20, 2007
E-Lecture

Ethnic Cleansing and the Wooden Effigies
of the
Kafir
By Brenda Gladwell
This lecture is about the wooden effigies of the Kafir in Pakistan and Afghanistan. Students will study the wooden effigies that stood guard over the ancestral graves of the Kafir. They will also learn about the culture behind these images. Discussion questions will encourage
students to think about how they would like to memorialize their culture and what they would leave behind to mark their existence. Students will also discuss how they feel about the destruction of the museum in which these artifacts were kept and the ethnic cleansing of the Kafirs in Pakistan.
History of Objects:
Within the Kafir culture there are wooden carved figures that set at the head and foot of each wooden coffin. Similar figures would stand guard over fields to protect the harvests. The most impressive of the figures would be placed at the grave yard of the Kafir’s ancestors. There are enormous wood
 en soldiers on horseback that stand at the foot and head of the above ground coffins. The coffins are simple wooden boxes. The Kafir let the bodies decompose until only the skeletons were left. Then the bones would be taken back to the villages and placed in the middle of the town square to be a part of the community council. The wooden effigies that protected the ancestors had great meaning. Prominent people in the community would be identified by how elaborately th statue was carved. Extremely important people were often memorialized with statues of people on mounted horses or even two headed horses. The images themselves were decorated with tassels and embroidery. The museum in Kubal housed twenty of these wooden images. Until 1993 when it was bombed and looted. The United Nations tried to stop the looting but 90% of the collection was destroy it would destroy all artifacts of pre-Islamic cultures. Statues and object in Afghanistan were destroyed. A few artifacts occasionally turn up on the black market, but there is no way to regain the cultural legacy of the Kafir people. What was left of the wooden structures was said to be used as firewood.
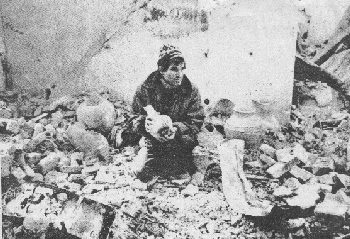
Najibullah Popal deputy chief of Kabul Museum over the destroyed treasure. (1993)
Historical Background:
Long before Afghanistan was a country it was part of the Great Persian, Greek, and Indian Empires. The trade route of these great empires was known as the Silk Road which cut right through what is now Afghanistan. This territory was always in turmoil over property and wealth from the trade route. The Kushan was one of the many tribes that fought over this area. In the 13 century, Genghis Khan ravaged the country, destroying almost all in his path except for the Kushans. Many years later Alexander the Great passed through the Kafir territory with the intent of conquering the people of the area.. Upon meeting the Kafir people, Alexander was surprised to see similar physical resemblance to there own and assumed the Kafir were of the same proud heritage, he let them join in his forces establishing his empire. Like many warring cultures of the time, such as the Kushans, the Kafir took slaves from conquered areas and killed many neighboring people. A tribal culture that lived in areas throughout Pakistan and Afghanistan. The Kushan people were broken up into small fractions. Each fraction developed different languages. The Kafir never developed a written language to keep track of their history. Instead, they passed down stories about their ancestors to the next generation.
The passing of time and the rise in Islam, caused a decline in the population of the Kafristan people. The last of the Kafir tribes remained in the Hindu Kush valleys but by the end of the 19 century the Kafir people were out numbered and surrounded by Muslims . The Muslims called the Kafir ‘infidels’. In Pakistan, Kafiristan means “Land of the Infidels.” The Emir of Kabul was determined to cleanse Afghanistan of the Infidels or convert them to Islam. A few of the Kafir escaped to Pakistan but they were greatly diminished in numbers by the end of the 20 century.
 Present Day:
In 1965 the Kafir still exist in Pakistan in small numbers. In an effort to bring Islam to every one in Pakistan General Zia initiated the jihad. The Taliban took over the Kafir land between 1981 and 1995. They built mosques and seminaries on the land where the Kafir lived and the Kafir people were forced to convert to Islam or die. The few Kafir people that still did not convert were forced into menial livelihoods. With no written language to preserve the history of the strong warrior tribes, the only evidence of their existence was the wooden effigies of a proud culture. In Pakistan today there are less than 2000 Kafir descendants left ,and they have become more of a oddity than a culture. Very few Kafir know how to read and write and they are treated like animals. They are denied jobs and forced to live with their farm animals. Visitors who tour the area have to pay a toll to the government. The toll is jokingly referred to as “a trip to the zoo.”
Discussion Questions:
Why do you think the wooden men were created?
What was their purpose?
Why would it matter if they were destroyed or not?
If you were to make an image to guard over you, what would it look like?
What are your feelings about the way the Kafir history will be remembered?
How do you feel about the destruction of the culture and artifacts?
Do you think the Kafir should have been forced to become Muslim?
Do you think they deserved to be treated this way because of their ancestral history?
What other cultures do you known of that have vanished? Why?
Do you think it is right? Why?
Do you think it is wrong? Why?
If you conquered a neighboring country would you destroy its past history and disassemble the culture? Why or why not?
During a war do you think the museums should be destroyed an why?

(Click on the picture above to go to the website it was found!!)
Activity:
Make a guardian statue of your own. Students will create a free standing image from cardboard by using cardboard scarp pieces to build up a 3Dimensional sculpture to represent their culture.What is it about your history that you want it to symbolize? Include items that are important in your culture. Write a short paragraph about what your guardian represents.


Sample of guardian made of cardboard
Lesson Plan.......Alebrije animals

ALEBRIJE ANIMALS
Teacher: Brenda GladwellGrade Level: 7th
Title: Alebrije animals
History and Background:
Alebrije is a Mexican slang word meaning fantastic figures. These fantastical figures are made In a small town in southern Mexico called Oaxacan. The people of this village have been making these animals for generation. The men typically carve the animals from branches of a Copel tree. The women are normally the painters of these wonderful creators. The skill and craftsmanship of making these animals has been handed down from generation to generation in these area of Mexico.
Standards:
• 1.a - apply existing knowledge to generate new ideas, products, or processes.
• 3.b- locate, organize, analyze, evaluate, synthesize, and ethically use information from a variety of sources and media.
• 4.c- collect and analyze data to identify solutions and/ or make informed decisions.
Goals: To create a Alebrije animal using reference, color scheme, and design patterns from Oaxacan Mexico.
Resources Materials/ Visual Aides:
Images of Alebije animals
Map of Mexico
Example of Alebrije amimal
Examples of pattern and colors that the Oaxacan people use to embellish Animals
Supplies/Materials:
• Masking tape
• Paper plates and cups
• Tempera paint
• Acrylic paint
• Paint brushes and sticks
• Scissors
Teacher Preparation:
Teacher will get all supplies ready. Teacher will fine web site of Alebrije animals.
Teaching:
Begin by defining Alebrije animals and were they are made in Mexico. Describe how these fantastic animals are made in Mexico. Tell students that they will make there own whimsical animals from paper cups and plate and create a solid from by taping them together. The creatures will then be painted in the same style as the Oaxacan people of Mexico.
Directions:
1. Have students look at different Alebrije animals on computer
2. Make sketch of Alebrije animal they would like to create
3. Assemble animal out of paper cups and plates using tape.
4. Use masking tape to cover entire surface of animal so it can be painted.
5. Paint base colors of animal with Tempera paint.
6. Paint designs on animal with acrylic paint using sticks for dots and small brushes.
Time Budgeted:
Five 45 minute classes
1. Class-Discuss,get references and design sketches of Alebrije animals
2. Class- Constuct and create 3-D animals
3. Class-Paint/Decorate surface of structure( might require two class depending drying time)
4. Class- Finishing / Critique
Critique/ Evaluation/ Assessment:
When students are finished with there animal they will each present there piece to the class. The students will describe how the achieved the designs and shape of the animal. Each student will reflect on the original way that the Oaxacan people create their Alebrije animals.
Vocabulary:
Alebrije animals- Mystical/Fantastic animals carved out of the Copel tree.
Embellish- to add detail to or to decorate
Oaxacan- An area in southern Mexico where Alebrije animals are made with the same techniques handed down through generations.
Safety Concerns: None
Bibliography/References:
Sample of designs of Alebrije animals
http://www.oaxacafinecarvings.com/
Sample of designs of Alebrije animals
http://www.elbalero.gob.mx/kids/about/html/traditions/alebrije.html
Map of Oaxacan Mexico
http://www.mexconnect.com/mex_/oaxaca/mapoaxaca.html
Oaxacan Mexico
http://en.wikipedia.org/wiki/Alebrije
Subscribe to:
Posts (Atom)


